Tuesday, September 2, 2014

Roof progress

It's been a while since I updated.  In the last post, we were tentatively exploring the roof and optimistic about the quality of the aluminum to be found under all of the goo.  So we got a couple of tarps and a cheap oscillating tool from Harbor Freight and went to work.


 I spent hours on that roof, scraping and scraping.  I was able to spend a lot of time looking down on the fleet.

Perhaps this is a spoiler, but that black tarry stuff wasn't coming up.  I briefly considered using a portable torch, following the example of my grandfather when he was removing the linoleum from his kitchen floor.  I was only a small fry, but it made an impression.  And the black goo from that memory looks a lot like this stuff.

We did go on our Memorial Day camping trip.  The roof was incomplete, but we brought the tarps along and hoped for a dry weekend.  A lot more beer was going to be needed to complete this project.


Monday, May 5, 2014

Goodbye, old roof, I'm a-leavin' Cheyenne

So we discovered after getting Winnie out of storage that she leaks.  A lot more than was disclosed.  I had to take a somewhat spur of the moment trip for work, which didn't give me much time to check it out.  I still had a tub of elastomeric goo we got with the Aristocrat, so I quickly slapped it on the roof and went to North Carolina hoping for the best.  It proceeded to rain buckets while I was gone, which kept the missus busy putting buckets inside to catch drips.  We camped this past weekend, but fortunately the weather dried up in time.

Yesterday when we got home, I climbed up on the roof and started scraping.  There are about 6 layers of sealant, and none of them do their job.  Which means they all gotta go.  I think it's going to be a monumental task.  Especially since we are camping again on Memorial Day, which is only three weeks away.  Nothing like a deadline to motivate a person.


There is nice looking aluminum under there....

Sunday, April 27, 2014

Goodbye, 1969; hello, 1975!

Nancy here. Our last post was in 2012, and there have been a few changes. Namely: we upgraded in a big, bad way and are now the proud (and slightly perplexed) owners of a 1975 Winnebago 5th Wheel. We sold the Aristocrat last Monday to a charming couple with kids. They seemed to love her vintage charm. I think she's gone to a good home. But oh, that gave me a serious pang to watch her pull away. I am going to miss that little camper.
 
The two old ladies got to hang out together for a couple of days before the Aristocrat's new owners claimed her.

 So, why the upgrade? Well, as darling as the Aristocrat was, with two teenagers, two dogs, and us, that 13' cutie pie became a bit too wee. We started looking for something slightly more spacious last summer (yet still vintage), got unexpectedly bit by a vintage 5th wheel bug, and found and bought "Winnie," as we're calling her, the first weekend of November. Since we're in Minnesota, that was at the very end of the camping season. We hooked her up...and took her straight to storage.

 It is an exercise in frustration to buy a camper and then not be able to access it for the next five months.

 We picked her up last weekend and have been putting in some serious elbow grease ever since. Structurally, she's sound. There are problems, of course. There's some water damage and rot; we need to stop the roof from leaking; we need to replace some wall panels and some all ceiling panels; but we'd identified those issues when we first inspected her (and honestly, I'd be shocked if an almost-40-year-old camper didn't have issues). There's something funky going on with the battery hook-up that has Pete scratching his head. I am deeply suspicious of the frig. (Deeply.) We need to seal, seal, and reseal that roof.

Roof aside,  though, none of that is why we've been putting in the elbow grease.

 She was FILTHY.

 The guy we bought it from had only had it a year and was selling it because his wife hadn't taken to camping. With the condition poor Winnie was in, I can see why. Layers of grime. We're talking YEARS of accumulated filth. She'd been hanging out at a farm for a while, and there were years' worth of dead black flies and the bugs that look like lady bugs but aren't lady bugs piled up in the corners of all the cupboards and underneath the beds. She stunk like a farm, too -- the manure pile part of the farm.

It was one of the nastiest things I've ever seen. And again, we knew this when we inspected her last fall. But that didn't scare us off; that's just surface dirt. The bones are good. I'm not afraid of cleaning.

 I have to confess, though, that I didn't realize it was THAT bad until I actually started the cleaning.

 But after some pretty hard core cleaning sessions, she's looking (and smelling!) much better. If the seller had cleaned her up, he could have asked for another $400-$500. Or maybe his wife would have liked camping... 
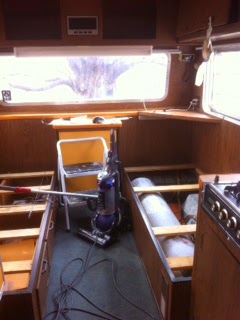
Here's what we've done since getting her out of storage last weekend. I didn't even take before pics because it was so foul, I jumped in and started scrubbing. These are all in-process pics:

 - removed the mattress, currently on Craigslist as FREE but will probably end up at the dump, because it's stained and stinks and is just generally nasty.

 
The nasty mattress. There is no way I'm sleeping on that thing. No way in hell. 

 - scored a new short queen mattress on Craigslist, claimed never used
 - removed the privacy curtain and threw it out
 - removed the shower curtain and there it out
 - removed the upholstery, washed it twice with bleach, and let it sir outside for a week
 - spot cleaned the foam (which is in remarkable good shape), Fabreezed the hell out of it, and let it sit outside for a week
 - removed the particle board bed platforms and threw them out
 - got new pressed wood and cut to size to replace the particle board
 - vacuumed out the cupboards to suck up all the dead bug corpses. Twice.
 - scrubbed out the cupboards, twice, the second time with bleach
 - scrubbed and bleached the sinks
 - scrubbed and bleached the counters
 - scrubbed and bleached the drawers
 - triple scrubbed and bleached the frig/freezer
 - removed all the curtains and washed them twice
 - vacuumed, vacuumed, and vacuumed
 - vacuumed beneath the goucho beds twice, scrubbed all non-carpeted spots with bleach


 Remaining Cleaning to-do
 - the bathroom. Eek.
 - clean the carpet. Ultimately, we'll pull it all out and replace with a hard floor, because honestly? Carpet in a camper is STUPID. But since we're taking Winnie out on her maiden voyage next weekend, for now, the carpet stays. But cleaned.
 - wash the windows
 - Wrestle the upholstery back onto the foam and put back into the camper
 - wrestle the new mattress into the camper and onto the bed platform
 - rehang the curtains. Ultimately, those will be also be replaced, but for now, they'll do.

 General to-do (this will be added to. Oh, will it be added to):
 - have Pete rename this blog (because he's the owner! I only have posting privileges)
 - test the water lines. Pete's out of town for work all week and I'm single mom'ing it, so this may not happen before that first maiden voyage. That's OK, we don't mind dry camping.
 - figure out what's going with that battery hook-up
 - get a new outside wall vent cover
 - get a new outside wall power cord compartment cover
 - get a screen door slider
 - chucks
 - links levelers, because our friends Eric and Val tell us these are essential for bigger rigs.
 - seal the roof. Pete already slapped one layer on--there are more to follow.
 - get a new shower curtain
 - get a new privacy curtain
 - rip out the carpet, replace with hard flooring*
 - replace the curtains*
 - replace the upholstery*
 - fix/adjust a couple of window cranks. They open, just not all the way. And one won't close all the way. You can tap it closed with your fingertips from the outside, but that's not a good long-term solution.
 - repaint the "W" and the stripes.

 And to wrap this up...in the middle of all the scrubbing, I did make time to go find a few fun vintage pieces for our girl. Consider these the first shots in returning her to her true 1975 style:


*Someone somewhere along the line of owners replaced the original (orange!) shag carpet and linoleum with blue. We know this because there are remnants of that shag and linoleum beneath the beds, the seats, the closets. And they replaced the upholstery, which was also a glorious orange and brown, with some 1980s/maybe early 90s mauve/dusty rose/blue crap. We know this because we found one of the original cushions shoved under the queen bed in the upstairs. And the curtains...OK, I have no idea what the curtains originally were, but they replaced those too, in blue.

We will ultimately strip all of this out and replace it, maybe not with a full throwback to the 70s, but something funky and fun and befitting the era.

Tuesday, October 9, 2012

Trunk repair

After owning the Aristocrat for over a year, we've got a pretty good idea of where a lot of her deficiencies are.  We had back to back weekends where we
a) weren't camping, and
b) were actually home

So I decided to take advantage of this time and fix something.  Anything.  I chose the rear trunk door, because it's been troublesome.  And since we've also got some main entry door issues, I thought the trunk would be a good place to make all my mistakes before working on the main door.  When we got the trailer, it had this nifty secondary latch installed, as seen below.  Basically, a chunk of wire attached to one of the window screws, and the other end wraps around the door handle.

 I enlisted my friend Joel's help for this, figuring I needed somebody to share the blame if it didn't work out.  Below, Joel starts to remove rusty screws.
 This view shows the door removed, and the channel where the door attaches.  There is a length of wood that sits inside the channel that the door screws to, but it was half rotted away.  This end shows the wood fragments that were left.
 We then removed the lowest piece of skin that ran all the way across the bottom of the rear end.  You can see it hanging down.  It's actually two different pieces that meet in the middle.
 Below is the door, with the wood cross piece it should attach to.  You can see how ragged the end is.
 We threw the door up on some sawhorses and started to remove the hinge.  It didn't come easily, and involved lots of hammering with a semi-hard mallet.
 Once the hinge was off, we could see why it didn't slide off easily.  It was filled up with 40+ years of gunk.
 Next, we removed the edging all around the door.  And at that point, it basically collapsed.  The wood inside was completely waterlogged and crumbled into multiple pieces.
 A better view of the wood.  That glue wasn't doing anybody any good at this point.
 We had to drill out the screws holding the handle on.
 After measuring and cutting a new piece to mount the door to, we laid the old piece next to it.  There is a pretty sizable difference between what should be there and what was there. Nearly a foot was missing from the street side of the camper.
 This blog does not endorse mixing beer and power tools.  Safety first.
 We ran into trouble when replacing the interior wood.  We measured what was in there, and decided to use 3/4" treated plywood.  After buying a full, not cheap, 4x8 sheet and cutting it to size we discovered that 3/4" is too thick.  I'm guessing the old wood had swelled, and was measuring larger than it should.  We went back to Home Depot and picked up a sheet of 1/2" treated.  We recut, and found that it was too small.  But since it was getting later in the day and Home Depot didn't carry 5/8" treated, we made it work.  But a word of advice to anyone trying this repair:  5/8" is the size you want.
 Joel re-installs the hardware for the door handle.
 The door, fully reassembled.  I didn't add the "You're following an Aristocrat" badge back yet, because I'd like to see if I can get it looking a little nicer.  I probably should have gone with new sheet metal, but I pounded out some of the dents, so it does look better than when we started.
 The new door, fully installed.  I added a second support chain on the street side, so now when the door is open it is supported evenly.  Should reduce any stress torsion that would cause the door to loosen up again.
 And closed.  It seems to open and close much easier now, and fits the frame better because it's aligned and mounted to a non-rotted piece of wood.  I plan to still use the wire secondary restraint system, at least until I feel comfortable that it won't flop open.  Maybe once I get new lock cylinders.  We don't have keys for either lock in this door, so they can open without warning just due to road vibration.
 A closeup of the new chain.  It's shinier than the old one.
This was a quick and dirty job, no question there.  I would have done more, but after getting the support beam out and seeing the amount of rot, I know that this back end is going to need to come apart again in the future.  So I'm going to leave the fancier repair until then, including doing some re-location of the rails on the side.  I think this camper has a potential to be a real can of worms, and I want it to be in one piece, as we have another trip planned for this coming weekend.

Monday, August 6, 2012

Minneopa

We took the Aristocrat out to Minneopa this past weekend. We had rain Friday night. The camper stayed dry, with one minor exception. The rear trunk leaked, and the camper was tilted forward just enough that the water ran into the camper. During a break in the rain we went outside, cranked the tongue up an inch or so and didn't have any further issues.

The tow vehicle ran hot all the way down. I found a cracked hose which I replaced on Saturday afternoon, after a lazy morning spent reading in the camper. It took care of the temp issues, but I suspect there is still a vacuum leak somewhere, as it still hesitates under load.

While in town getting the hose, I picked up some additional extension cords so we could plug in our festive lights.

Thursday, May 10, 2012

Spring safety

1969 Aristocrat Lo Liner
New tab is affixed to the trailer, and we're legal to camp for another season! We have reserved a campsite for this weekend, which will be our first outing in 2012 for Lola and us. We will be camping at Frontenac State Park, and due to limited availability we will not have water or electric hookups. In anticipation of this, I've been reading up on 12v systems. Lola came with rewired 120v that has worked well for us. But the 12v system hasn't been touched since 1969, and looks downright frightening. So we'll be camping off the grid, or "boondocking" as this is referred to in the RV literature and forums I've been reading. It should be interesting to see what we think. In anticipation of this, I spent some time on Monday night playing around with the propane heater. The previous owner told us it ran, but they installed an electric heater and didn't use the original propane. After reading and following the instructions written inside the heater cavity, the pilot light lit and the furnace fired up. I left it running for about 20 minutes while I took some inventory inside, and it warmed the camper right up. And even more importantly, it didn't trip the carbon monoxide detector. I tested that as well. So even though we won't have power, there's no reason for us to be cold. We can cook and make coffee using the propane stove. The only things we will really miss will be the fridge, lights and radio. After this weekend, we will have a better idea of any other "misses" we feel are lacking. One thing that is always on my mind with towing this trailer is safety. Any time you're dealing with 40+ year old equipment, there's potential for issues. So far things have gone well, but one thing that made me nervous on all our trips last fall was the sad safety chain. Yes, chain singular. There was one chain wrapped around the trailer frame and secured back to itself with a rusty bolt. The other end attached to the vehicle with a rusty D clip spring. Neither the D clip, chain or bolt looked sufficient to hold the weight of a runaway trailer. I replaced the chain with two actual tow chains from Menard's. The new chains are bolted directly to the trailer frame and are rated to handle much more weight than our trailer has. We can now also cross the chains under the tongue as is recommended. And, they're shiny!
1969 Aristocrat Lo Liner
If we ever get to a point where we repaint the tongue and frame I'll have to remove them for the stripping and painting process, but that's pretty far down on the "to-do" list, so it's not worth the wait.

Friday, November 4, 2011

Nerstrand Big Woods

In a nod to the cooling weather, we headed south.  OK, so 50 miles south doesn't make much of a climate change but it's the thought that counts.  We stayed at Nerstrand Big Woods State Park with friends from college.  It was a lovely weekend of reminiscing, catching up and meat.  We also met some fellow old camper enthusiasts.  One gentleman talked to me as I came out of the camper on Saturday morning, wondering who manufactured our Aristocrat.  He had a 1973 camper that was three sites down that shared some similar lines and he wondered if they were made in the same factory.  I didn't know enough about the company history, but it seemed likely.

We also met some folks who were camping together in a pair of fiberglass campers.  One was a 16' Scamp that was nearly identical to a Scamp we rented this spring to see what we thought of hard sided camping.  The owner had repainted the exterior so the Scamp logo was gone, and then added some dayglo vinyl flower stickers.  So we felt a kinship with our glittery "Peace" sign and butterfly decals.  The other camper was a Trillium.  Trillium is still manufacturing trailers, but this one was from 1973.  The owner had done a nice job of cleaning it up and redid most of the interior wood.  It was very nice.  Unfortunately, I failed to take photos of any of these 3 campers.  You'll have to be satisfied with the few that I did take.